How To Install Shaders in Minecraft
Updated: May 10,2022
Minecraft is a fantastic game. But, let’s be perfectly honest here, it’s not a visual spectacle. It wasn’t something to write home about when it came out in 2009 and certainly isn’t more than ten years later. The blocky looks are certainly a part of its charm, and they certainly help with running the game well, even on older systems. Meanwhile, modders have found ways to make the game look amazing, especially if you have an RTX-compatible card such as the RTX 2070 or better.
You, too, can make your copy of Minecraft look out of this world. In this article, we’ll teach you how to install shaders, set them up for the best performance, and where to find all the necessary files. Best of all, the tools and files we’ll be talking about today are completely free to download and use. Let’s get started, then.
The Tools
Before we proceed to installations and settings menus, there’s a list of specific requirements that need to be met. Otherwise, the shaders won’t work. Like with any job, you’ll need the appropriate tools and the right work environment. Luckily, this doesn’t involve any complicated method or hacking, but it’s vital that you follow through all of the steps in this Minecraft shaders guide to be 100% sure that everything will work in the end.
Minecraft Version
Your game needs to be updated to the latest version for mod files to work. If you’re already playing Minecraft regularly, it’s most likely already updated and ready to go. But, just in case, fire up the game, create a profile if you haven’t already, and let it check for updates. Once everything’s downloaded and installed, close Minecraft and head to the next step.
OptiFine
This is our groundwork for the rest of the Minecraft shaders tutorial. Since the vanilla game doesn’t support custom shaders, you need to install this additional software to make the magic happen. For that, you’ll need OptiFine. It’s both a tool for processing custom shaders and a Minecraft optimizer, meaning that it will make your game run even better.
Since some shader packs can be quite resource-intensive, it helps already having something that optimizes the game. Of course, it’s a free download, and it’s very lightweight, so it shouldn’t take too long to set up.
Shader Packs
The final piece of the puzzle is the shader files themselves. A Minecraft shaders pack is a set of files that changes the way the game renders the environments. Custom shaders can, for example, add reflective surfaces, more natural lighting, realistic water effects, or add various filters. Whichever effect you desire, you can browse the packs at shadersmods.com and resourcepack.net, two of the most extensive repositories for mods and add-ons.
Just make sure, when downloading a chosen pack, that you’ve selected a version compatible with your game’s current build. That’s all you need to download. Next, it’s time to install and set everything up.
How To Install OptiFine
OptiFine comes in the form of a .jar file. This is a Java executable, just like the game itself. Therefore, you don’t need any particular program to run it, only the Java binaries installed on your system. If double-clicking on the file doesn’t work (you’ll know by the missing icon), then all you need to do is right-click on OptiFine’s installer, select Open With, and then click Java ™ Platform SE Binary. This immediately starts the installation, and you’ll be greeted with a window like this one:
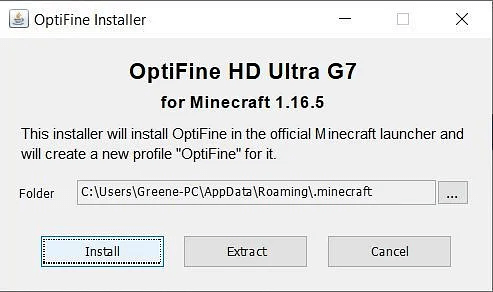
You most likely won’t need to do anything on this screen except clicking on the big Install button, waiting a bit, and then applying the Minecraft shaders pack you’ve just downloaded. The folder address is automatically entered, and it’s the default location of Minecraft’s shared files. Unless you’ve manually modified that folder, keep it as is and let the installer finish up.
Once the installation is complete, launch Minecraft to make sure that the game recognizes the files that OptiFine has just copied to your computer. At the launcher screen, next to the Play button, there should be a drop-down list. Click on it, find OptiFine, select it, and hit Play. That way, ensure OptiFine will be enabled each time you launch the game.
How To Install Shaders
One of the additions that OptiFine brings to your Minecraft installation is another folder designed specifically for housing custom shaders. This is where, you guessed it, the shader pack you just downloaded goes. Instead of digging through your computer’s drives in search of that folder, we’ll employ a simple trick to get to this folder in just a few clicks. First, fire up Minecraft (make sure OptiFine is enabled in the launcher), then head to the Options menu.

From here, you’ll need to click on Video Settings, then Shaders, and finally click on Shaders Folder. This will open up Windows Explorer at the exact spot where you need to drop the shaders pack for Minecraft. The most complicated part of the process is now done.
What’s left is to move the archive, usually a .zip or .rar file, containing the shaders of your choice into the folder we just opened. No need to unpack it; the game will recognize it as is. Once the file has been copied, close the folder and restart Minecraft, making sure OptiFine is enabled. Head back to the Video Settings menu, and in the Shader Settings submenu, check whether the game lists the pack you just installed. If it’s there, select it, click Done, and that’s it.
You now know how to install shaders, so it’s finally time to sit back in your favorite gaming chair and play some Minecraft with brand-new graphics.

If you’re looking for more detailed settings for each shader pack, simply read the accompanying ReadMe document provided by the author. This document is often included either in the archive or the modding website as a note from the developer. If you run into any issues or the framerate tanks, even your RTX 2080 graphics card, just disable the shaders or revert the settings to their defaults. You can have as many Minecraft shaders installed as you like, but only one of them can be enabled at a time.
Frequently Asked Questions
FAQ
Shaders require the installation of OptiFine, a mod that enables Minecraft for custom visual effects and shaders. Once it is installed, it needs to be enabled from the game’s launcher. Then, it’s just a matter of dropping the shader file into the game’s folder and selecting it from the video settings menu. Some shaders require ray tracing-enabled graphics cards to run, so be sure to read the system requirements provided by the author.
OptiFine can be downloaded for free from its official website. After that, you’ll need to double-click on the .jar file that contains the tool’s installation and follow the on-screen prompts. Once the installation is completed, you can copy the shaders to the game’s folder and enable them in-game.
There are several websites that host shaders and shader packs. Shadersmods.com is probably the most well-known repository on the Internet.
Yes, OptiFine is a mandatory install. As we’ve mentioned when explaining how to install shaders, Minecraft by itself cannot detect shaders. You’ll need to mod it to enable this feature, and OptiFine is the best choice for doing so.


Your email address will not be published.
While Damjan started his career in humanities, his interests quickly moved on to the tech and IT world. VPNs, antiviruses, firewalls, password managers - cybersecurity is what he knows best. When Damjan’s not losing hair over the dwindling of our collective sense of tech safety, you’ll find him looking for solace in 100-hour-long RPGs and rage-inducing MOBAs.